For months now, I've been toying with the idea of running a consignment shop from my home (or somewhere in close proximity). The thought alone is very enticing. With the ability to set my own hours, take care of my own children, be my own boss and all that goes with it, it was a hard dream to pass up. No matter how hard I tried, I couldn't give up on the idea.
I recently spent some time looking online to price out domain names, hosting packages, tutorials (yep, another one of those) on how to design and maintain my own website. I for one, am also very frugal and don't have a lot of money to spend. So, when I learned that I would be looking at about $50 a month, even to open up an online store through Ebay or Amazon, I wasn't interested. Today I learned that it is entirely possible to turn your every day, run of the mill blog into a store of sorts.
So, that is just what I did. I signed up for a blog, used PayPal buttons on it to allow customers to buy items I have "listed" (or more accurately, blogged). It's BRAND-spankin' new, so there are only four items up right now, but I plan to put more up in the very near future. I have decided to be very picky about the items I list. I will not accept damaged merchandise, or anything that doesn't come to me in a presentable manner. Nothing with holes, tears, stains, missing pieces or broken items will be allowed on the site. Right now, I am going to just put up clothing, mostly for women (including PLUS SIZES), baby clothes and jewelry. The items either have to be designer label items or trendy (hence the word "Chic"). Perhaps later on, we will list furniture, who knows?
PLEASE feel free to check it out and email me with feedback, suggestions, requests etc. keeping in mind that this is a new site, so there will most likely be wrinkles and kinks. Let me know what you think. The name of the shop is SAVVY CHIC CONSIGNERS
Here is the web address:
www.savvychicconsigners.blogspot.com
Jun 26, 2009
Pattern: Mary Jane Felt Baby Booties


I've had a few requests for the mary jane style baby booties that I make. I don't have a full tutorial yet, so I have decided to post the pattern instead at this time. Here is the link:
http://www.bevscountrycottage.com/images/30minute-bootie.pdf
When cutting, first cut the outline, then straight down the middle. After you've cut the center line down the middle, turn your scissors and cut along the line, but staying inside of the actual baby bootie. This will crate the ankle straps. I hope that makes sense. I'll try to clarify that with my tutorial that I dream of posting one day.
Jun 25, 2009
Autism and Criticism
Being the parent of a child with an Autism diagnosis is very difficult. Unless a person is a parent or care giver of a child who carries this diagnosis, it is almost impossible to really understand what day to day life is like for those of us whose children require a little or a lot of extras throughout the day.
I've come to a point, since my son was first diagnosed, where most of the time, life is good. Many people don't really even notice his issues and quirks. Upon observation, most people see him as just one of the boys. The only thing most people may notice is that sometimes, when he speaks, his words come out in the wrong order, and his use of pronouns is a little off much of the time. However, compared to when he was completely non verbal and non responsive, he is doing very well.
Every once in awhile, though, some parents catch wind of the fact that my son has an Autism diagnosis and they immediately pass judgement on him. I've been told that he must have been a "bad little boy in his past life, so he was sent back to do it all over again the right way", that he is a less evolved speciies [of an ape] than the rest of us, and even that he is a more evolved species than everyone else....he's also been called a "crystalis child" or "indigo child"....blah blah bla. The fact of the matter is, he is simply a child with a few quirks. I've come to understand what was said to me a few years ago when my son was first diagnosed. There are no such things as perfect children. ALL children have some kind of quirk(s) at some point or another. Every child goes through phases. Every child whines, cries, demands attention, runs, gets lost, can't go potty without mommy standing by, needs her blanky to fall asleep, might be a little dingy at times, is a slower learner at a certain subject than his peers or has some other issue. No child is absolutely perfect (sorry to burst your bubble). At the same time, all children have their strengths.
A few nights ago, I attended a meeting at a prospective school that I was looking into for my son. I rarely get the opportunity to have a baby sitter during the evening hours, and I do not have family that lives close by like many other moms do. So, with the permission of the one who was running the meeting, I brought my two older kids and my little baby. There were also about 12 other children who where a little older who came with their parents as well. My daughter entered the room a few times, wanting cuddles, or to whisper something in my ear, but she was always quiet and respectful. My son entered the room about two different times, and was a little louder, but was very easily redirected. I thought the older children did extremely well that night considering they had never been to this school and didn't know anyone else there, except me. At the end of the meeting, we all decided to make sure that we made arrangements for child care for all of our kids for the meeting that was scheduled for the next week.
In the mean time, one of the moms found out that my son has Autism. She called me the next day and asked me a bunch of questions including, "Is that why he was screeching outside?" (which, was what all the other kids were doing), and "does he qualify for special ed services, because we as a school do not want to deal with special needs" and the like. I answered her questions, but I was delighted when her phone beeped and she had to let me go. I didn't want special ed for my son. If I did, I would have enrolled him into public school, no questions asked, but that's beside the point. The next day, I received an email from another mom who said,
"I wonder what arrangements you will be making regarding care for your children for the meetings this week?"...."I wonder how things went for you last week at the meeting? For me, it seemed clear that the added component of all the young children without their own care providers affected the quality of our comminication and decision-making abilities."..."For the next two meetings in particular, our greatest attentiveness will be needed. I'd like to request that you keep your older children at home or arrange for their care at the school, with a qualified person that they will be comfortable counting on. Your baby, of course is fine to bring."
..and then was told by the first mom that it was my son in particular that they didn't want to attend the next couple of meetings. This was surprising to me since he interrupted less times than my daughter did. Also, there was one other little girl in particular that attended and sat on her moms lap the entire time, twisting her mothers hair, poking her nose, making loud, screechy noises, fussing and jumping up and down on her lap. No one bothered to ask her to keep her daughter home. Plus, I was the only one to recieve an email.
I definitely sent an email back to this woman, letting her know that first of all, I had made prior child care arrangements as per request of the members to every parent present at the previous meeting. I also let her know that I had found out that it was my son in particular that she and the other mom were worried about and that I had decided to cancel my childcare after all and not be part of their little clique. Finally, I made it known that as a private school that had existed for 30 years, I had already received clearance from the current board for my sons attendence, but if they as the new board thought they would only be receiving perfect children, they would be hard pressed to find them.
I post this only because for those of you with typicially developing children, remember, the next time you hear a screaming kid, or see a kid being sassy or abusive to his or her parent, or runing away in the parking lot...instead of judging the parents skills or the child and suggesting what disciplinary action should follow- take a walk for a moment in that parents shoes. Maybe that parent is doing a great job under the circumstanes they've been given. Maybe that child has sensory processing disorder, Autism, ADHD, or something else. Instead of making snide remarks or doing something else as equally hurtfull, offer up a friendly smile- or just walk by without condemning the parents. It's been a week and I'm just getting over the hurt of my little incident...
Then, something amazing happened. Someone on my facebook friends list posted a status suggesting that I treat lifes problems like a dog, pee on it and walk away.
SO...this is me peeing on it, and now- I'm walking away.
Jun 15, 2009
Wedding Gifts: 3 Teir Towel Cake


 Wedding season is upon us. By February, I had already received a save the date card for one scheduled for October. I'd like to show up with a gift, but not just the typical gifts of cards (that will most likely get tossed after being read), gift cards and dishes. I wanted to do something useful, yet nice. So, I found a tutorial (yes, another tutorial!). This Wedding Towel Cake is such a great idea because you can design it for any room in the house. You could make a bath/spa themed one with lotions, soaps, shampoos and bath salts stuck around the cake, or a kitchen themed one made from kitchen towels. The possibilities are endless. Here is a link to the tutorial, which is surprisingly easy to do: http://www.pashweddings.com/wedding-videos/towel-cake/towel-cake-h.php
Enjoy!
Please email pics of your wedding towel cakes so we can post them and inspire each others creativity :)
Jun 9, 2009
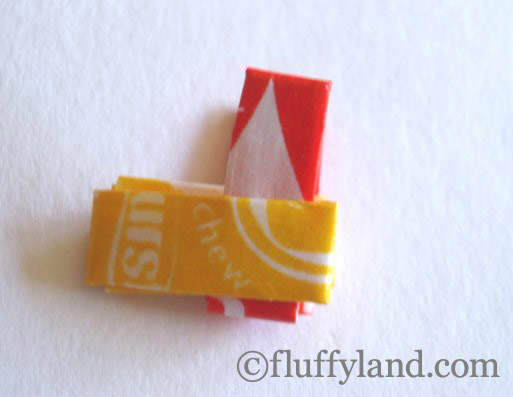
Candy Wrapper Bracelet Tutorial


It has long been a fascination of mine to find out how these candy wrapper trinkets are actually made. This seems to be the "easiest" of them all...even though all of them seem to be for the very persistent crafter. It is fun to try though, if you happen to have time on your hands. Here is a tutorial from www.fluffyland.com/blog
Starburst Wrapper Bracelet Tutorial

So, have you been wondering how to make the amazing bracelets from Starburst wrappers? A simple folding method, plus some finishing tips, will help you make your very own Starburst bracelet. Using these simple instructions, you’ll soon memorize the folding pattern, and it’ll be a piece of cake! (or candy..) The average bracelet takes 30-35 Starburst wrappers, so save up! Asking friends to unwrap carefully and “donate” helps quite a bit. Also, to avoid candy binges and sugar highs, unwrapping all your Starbursts and saving them in a ziploc bag for later munching is helpful.
Keep in mind that when you have finished, you need the bracelet big enough to slide on and off your wrist without too much trouble. Because of the folding method, the bracelet will stretch slightly, so this shouldn’t be much of a problem.. but be careful.
Click on any of the photos for a larger view.
Step 1
Take your first wrapper… and flip it over.
I know, it’s tricky.
Step 2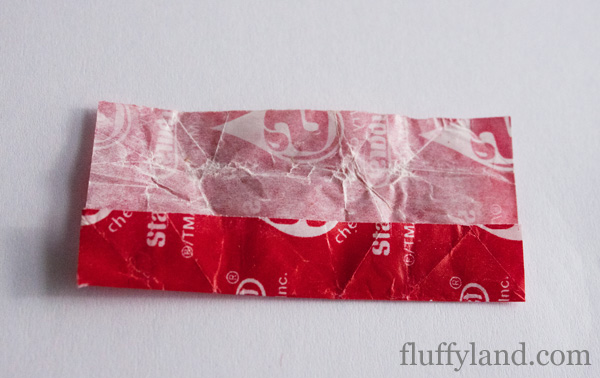
Fold (hot dog) one side in to the halfway point.
Step 3
Fold (hot dog) the other side to the halfway point.
Step 4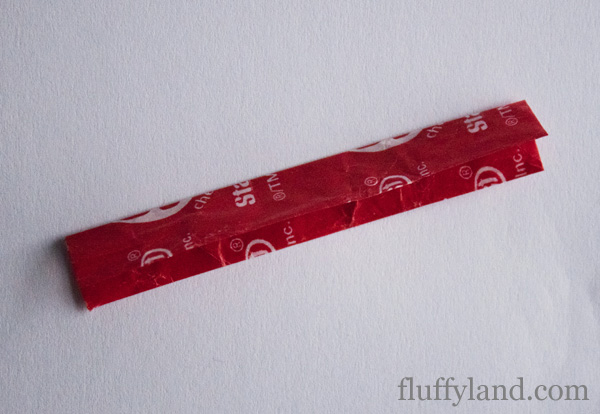
Next, fold (hot dog) the whole thing in half so the raw edges you just folded are on the inside crease.
Step 5
Fold (hot dog) in half again.
Step 6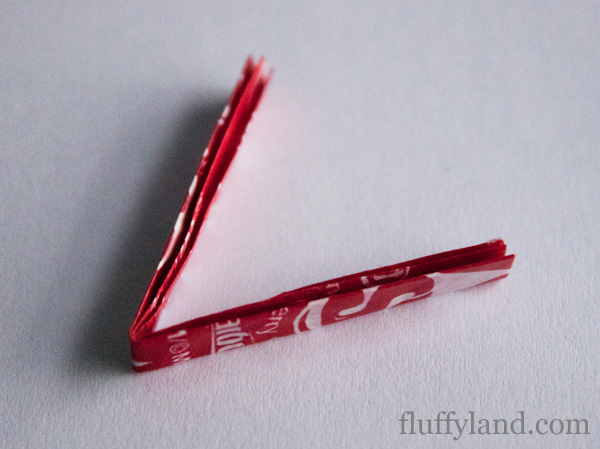
Fold (hamburger) in half.
Step 7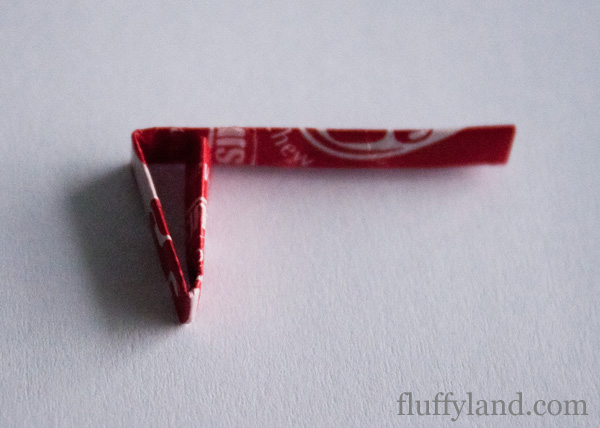
Fold (hamburger) one side to the halfway point.
Step 8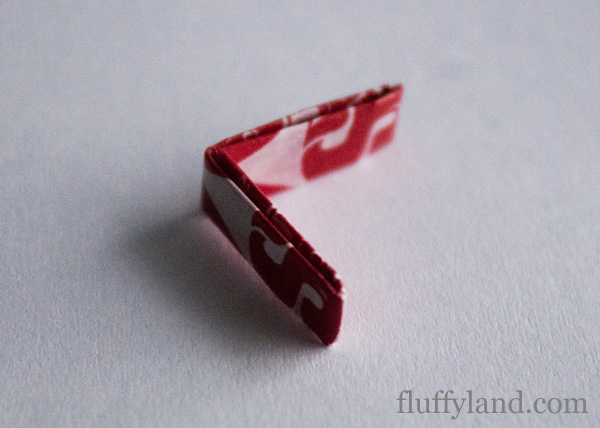
Fold (hamburger) the other side to the halfway point.
Repeat steps 1-8 with the next wrapper.
Step 9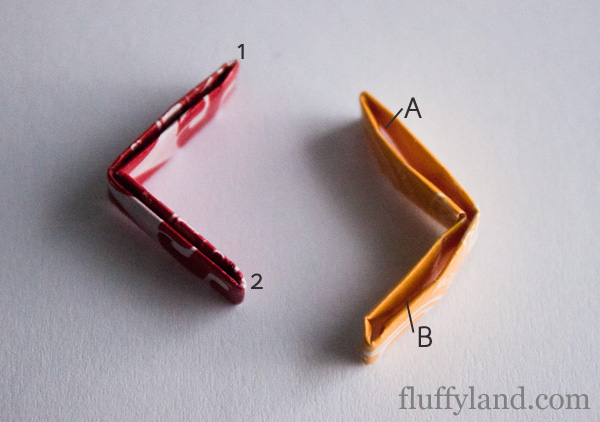
Insert points 1 and 2 into slots A and B, so it looks like this: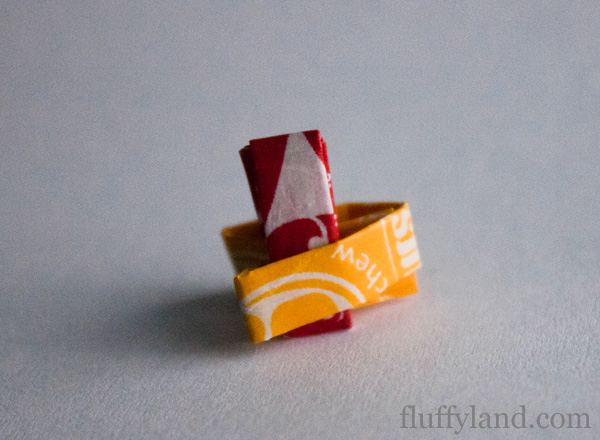
Step 10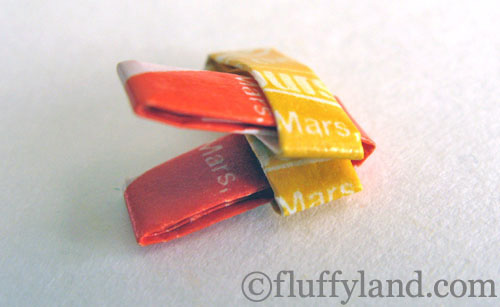
And pull it through.
Step 11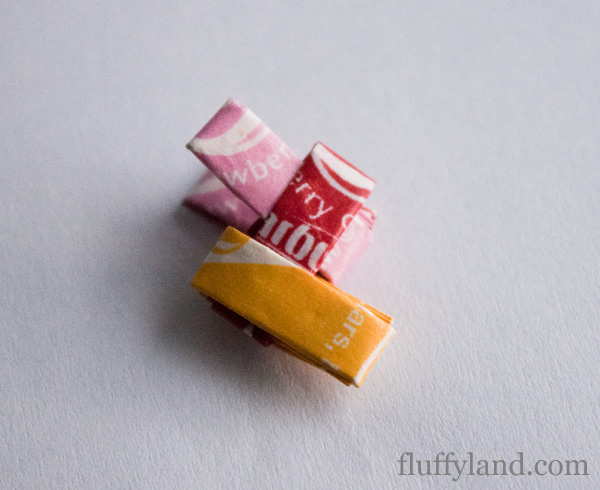
Continue steps 1-10…
Step 12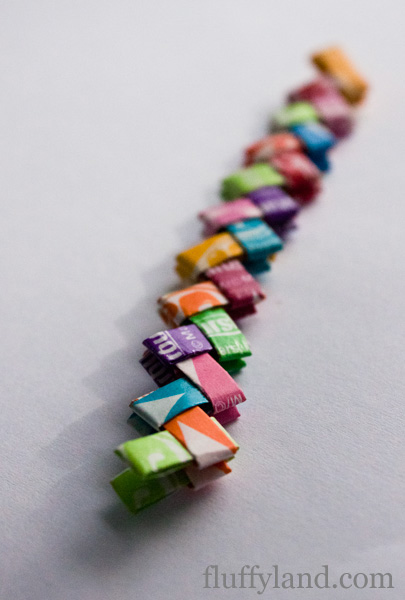
… until you begin to build up a chain.
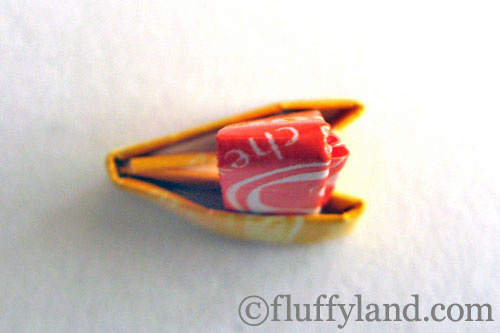
Step 13
Once you have reached the desired length… this is where it gets tricky.
Step 14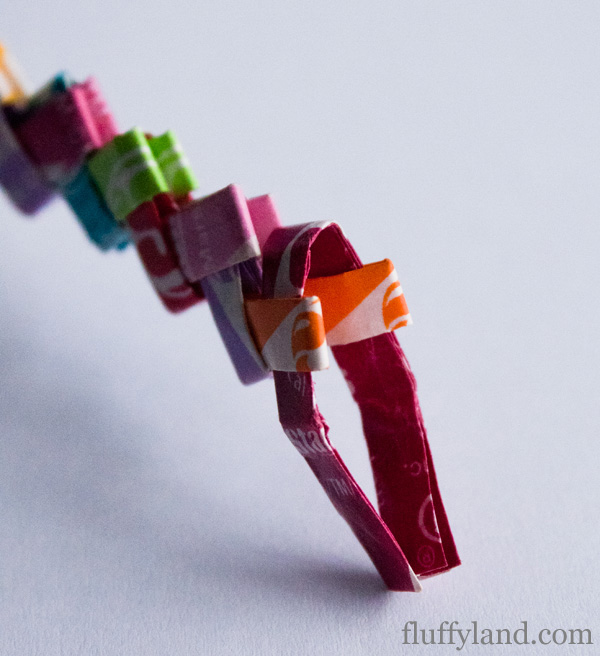
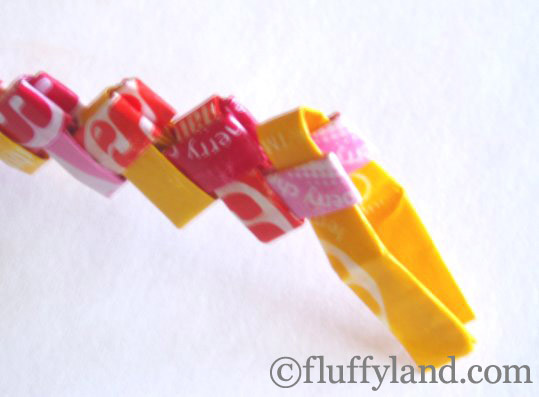
.. fold one more wrapper the same way as the others, but then unfold the last two folds. Insert these raw edges into the same spots in the “V”.
Step 15
Pull the two ends of the bracelet close together, and hold the edges of your long “V” over both edges of the end of the other side.
Step 16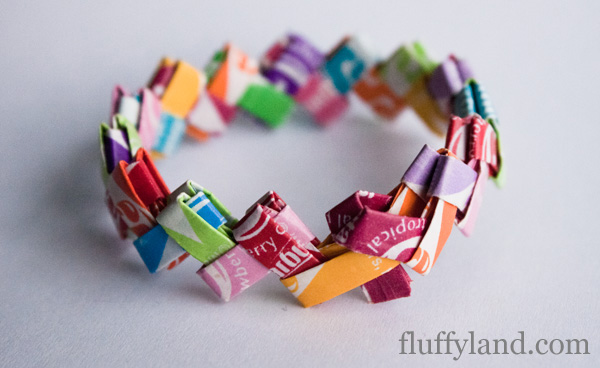
Insert the raw edges into the first wrapper. You’re doing the same thing we’ve been doing, but backwards.
Step 17
Pull ends through until you reach the original folded point.
Step 18
Tuck the raw edges into the previous wrapper, so it looks just like the other wrappers in the chain.
tip! at this point, i find it helpful to use a paperclip or similar item to push the wrappers through.
Jun 8, 2009
Tutorial: How to Make a Light Box
I found this tutorial on making a light box. What I love about it is the simplicity and the added bonus that these items can be found at most dollar stores and therefore, can be made inexpensively. I post a lot of pics online, so I'll be making one of these myself in the very near future. Thank you to pawandclawdesigns for this tutorial (Visit her shop for some great finds at etsy: www.pawandclawdesigns.etsy.com). Here's the tute:
The dollar price included the following;
MAKE THE BOX
BACKGROUNDS
Using the utility blade and yard stick, cut one of each color of construction paper into 7 by 7 inch squares. i like to do 3 of each color so I can "line" the box with color if I need to take a picture of a larger item.
You're done! To store it, set the paper squares inside the box and set it come place out of the way.
To use it, take it to a sunny window, a well lit part of your house, or even outside. lay out the pieces of paper that compliment your item, stage the shot, and photograph.
Voila!
The dollar price included the following;

- 1 20 inch X 30 inch Piece of White Foam Board ( Office Supplies)
- 1 Adjustable Utility Blade ( Hardware)
- 1 Roll Packaging Tape ( Office Supplies)
- 1 Yard Stick (Office Supplies)
- I Package Assorted Color Construction Paper (Toys or Office Supplies)
MAKE THE BOX
- Measure and cut the foam board along the 30 inch side. I cut mine 7 inches into the board, so i had a 7 by 30 inch rectangle of foam board. I used the adjustable utility blade and the yard stick.
- Cut a 7 by 7 inch square off the end of the rectangle you just cut ( or the amount equal to the width of your cut rectangle) This will be the bottom of your studio. Cut the remaining rectangle to 14 inches long 7 inches wide.
- This next part is tricky. you need to adjust your blade to just a bit LESS than the thickness of your foam board. Mine is 1/4 inch, so I made the blade depth just less than 1/4 inch. Next measure in 7 inches on the foam board ( so it's split in half) and cut the board, being careful not to cut ONE side of paper on the board. You now have a "V" of 2 attached 7 inch foam board squares.

- You MIGHT need an extra set of hands for this part. I was able to do it myself, but my tape looks icky. Thank goodness it's on the part of the box you don't see. Cut and attach two 7 inch pieces of packaging tape to the bottom square. Try to make them centered as best you can, so half of the edge is left out. Now, carefully bend the 2 attached squares to a 90 degree angle and set them on the bottom. carefully fold the tape up to secure the "sides" to the bottom.

DONE!
BACKGROUNDS
Using the utility blade and yard stick, cut one of each color of construction paper into 7 by 7 inch squares. i like to do 3 of each color so I can "line" the box with color if I need to take a picture of a larger item.

You're done! To store it, set the paper squares inside the box and set it come place out of the way.
To use it, take it to a sunny window, a well lit part of your house, or even outside. lay out the pieces of paper that compliment your item, stage the shot, and photograph.
Voila!
Jun 7, 2009
Baby Bib: Made from Recycled Food Packaging
In my daily finds today, I came across this idea of making a unique baby bib from recycled food packaging (in this tutorial, a package of Betty Crocker cookies). Here's the tutorial with instructions!Thank you to www.ILuvMoJo.etsy.com (She has a super cute shop at Etsy.com) for permission to use this tutorial.
Recycled Food Packaging Bib Tutorial
You'll need:
Step 1: Place your bib onto a large piece of paper and trace around it to make a pattern. Cut it out.

Step 2: Place the pattern piece on top of your wrapper to make sure it will work. You can make almost any wrapper work just by cutting it apart and taping it back together in the right shape.


Step 4: Pin the pattern on top and cut around it.

Step 5: Remove the pattern and sew around the outer edge of the bib. If you're using a sewing machine this part can be a little tricky, so go slow. ;)

Step 6: Add VELCRO or a snap to make it close and you're all set!

Recycled Food Packaging Bib Tutorial
You'll need:
- Bib - to make a pattern
- Food wrapper of some kind
- Clear vinyl
- Flannel or Fleece
- Scissors
- Thread
- Velcro or Snap
- Needle and Thread or Sewing Machine
Step 1: Place your bib onto a large piece of paper and trace around it to make a pattern. Cut it out.

Step 2: Place the pattern piece on top of your wrapper to make sure it will work. You can make almost any wrapper work just by cutting it apart and taping it back together in the right shape.

Step 3: When you have your wrapper all ready to go put it on top of your fabric wrong side to wrong side and then place the clear vinyl on top.

Step 4: Pin the pattern on top and cut around it.

Step 5: Remove the pattern and sew around the outer edge of the bib. If you're using a sewing machine this part can be a little tricky, so go slow. ;)

Step 6: Add VELCRO or a snap to make it close and you're all set!

Jun 6, 2009
Tutorial: Envelopes & Cards Made From Magazines
I really love art made from recycled items. Sometimes I just google a recyclable item and see what people are making out of them. A couple of nights ago, I googled "magazines" with the word "recycled" and "art" (with probably a few different variations), and discovered this pretty simple little tutorial on making envelopes and cards from recycled magazines. I thought they were adorable, and helped create a unique touch to any note card you might want to send. The possibilities are endless with this tutorial, so have fun with it. I'm in the process now of experimenting with it, along with my zillion other projects I've got going on. Special thanks to www.estelledeparis.com for permission to put her tutorial on my blog. She's very talented and I would encourage everyone to check out her blog and etsy shop :)
What do you need?
-Magazines
-An X-Acto knife
or a pair of scissors
-An envelope you take apart or a template you made in illustrator, photoshop or that you draw.
-A fine point or ultra fine point sharpie
-A ruler and/or a triangle. Triangles are neat to mare square edges.
-Glue
-Craft paper, card stock
-Optional: Lick & Stick Envelope Glue 1.5 Oz. Remoistenable or scrapbook/photo mounting tape You might consider getting some if you sell them or if you give them as a gift
Note:
-I use 3 different size templates that I lay on the illustrations I preselected and use the one that covers the picture the better.
The Envelopes
For this tutorial I’ve selected a painting from the magazine antique, one of my favorite source for making those fancy envelopes of mine.
1.Lay your template on the picture and outline with a pencil.
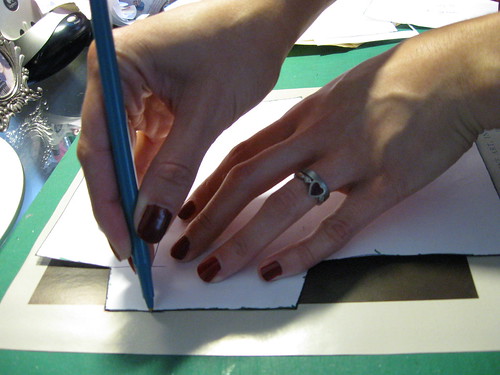
I personally prefer to cut paper with an X-Acto knife as it makes the edges perfectly straight but if you don’t have one, scissors work fine.
It should look like this
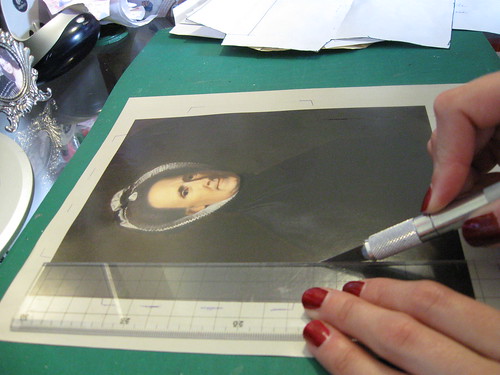
3.Fold the flaps.

It should look like this.

4.Line the inside. (Optional) You can line the whole envelope or just the flap, it’s up to you. Just note that lining the envelope makes a thicker material that would not rip easily. It can be a good idea if you consider mailing it.
First, make a template of the desired size. I copied the envelope template and cut it.
Glue your flap.

5. Glue the side flap and the verso of the envelope.

Recto
Verso
You can make tons and tons of them!
The cards
Depending on your selection you can make one that opens like a check book or one that opens like a regular book or a single sheet one. Here are a few exemples.
For this tutorial, I chose 3 pictures that I thought were matching the style of the envelope and decided to make a “tryptich” card. It is up to you and what you have to work with. I find it easier to make the card around preselected images rather than make the card and illustrate it afterward.

1. Make the card 1/8″ smaller than your envelope all the way around. It is very important to do so or your card will not fit the envelope!!!
2 Outline your picture with colored paper or card stock.

3.Glue the pictures on the card and voilà!


Subscribe to:
Posts (Atom)


